Key Lime Pie

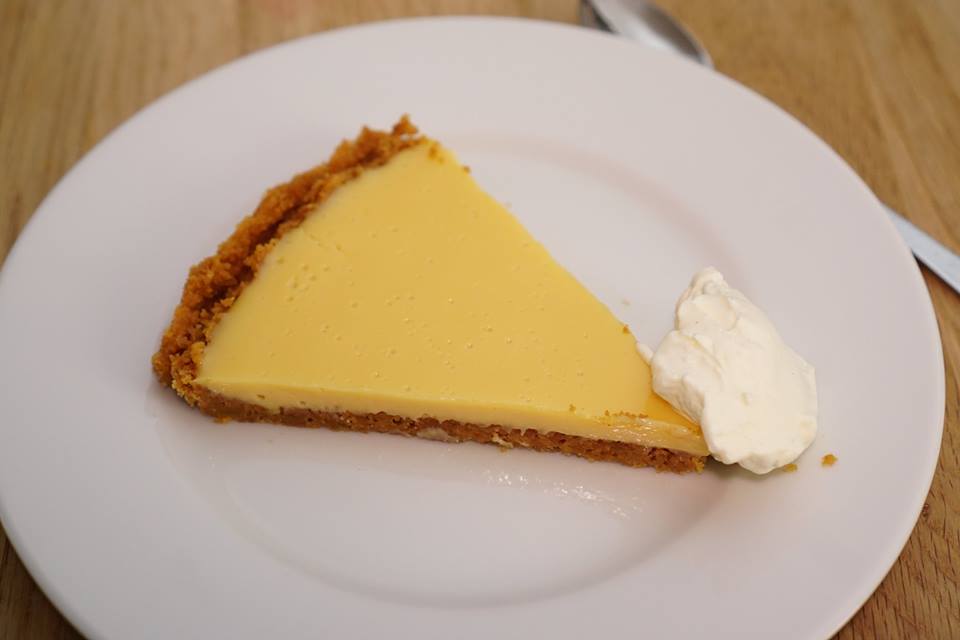
This pie is really refreshing, and pretty easy to make. I asked my boyfriend what dessert he wanted me to make him for his birthday, and he chose key lime pie. This recipe is always a big hit with my family.

I usually make it with regular limes but you can use key limes, if you want. To me, it is a bit too sour or strong in flavor with key limes.  In Denmark you can’t find graham crackers, so I use digestive biscuits instead which works really well. You can also make some freshly whipped cream to put on top. Hope you like this recipe. :o)

Key Lime Pie

Key Lime Pie

Ingredients

    For crust
  • 1 1/4 cups graham cracker crumbs crackers or digestive biscuits
  • 2 tablespoons sugar
  • 5 tablespoons unsalted butter, melted (70g)
  • For filling
  • 1 (14-ounce/397g) can sweetened condensed milk
  • 4 large egg yolks
  • 1/2 cup plus 2 tablespoons fresh lime or bottled Key lime juice
  • For meringue
  • 3 pasteurized egg whites (90 grams)
  • 175g sugar

Instructions

  1. Preheat oven to 350°F (176°C)
  2. Stir together graham cracker crumbs, sugar, and butter in a bowl with a fork until combined well, then press mixture evenly onto bottom and up side of a 9-inch (4-cup) pie plate.
  3. Bake crust in middle of oven for 10 minutes and cool in pie plate on a rack. Leave oven on.
  4. Whisk together condensed milk and yolks in a bowl until combined well. Add juice and whisk until combined well (mixture will thicken slightly).
  5. Pour filling into crust and bake in middle of oven for 15 minutes.
  6. Cool pie completely on rack (filling will set as it cools), then chill, covered, for at least 8 hours.
  7. If adding meringue on top, you need to make it while the pie is cooking. Using an electric whisk, mix the egg whites on a low speed until stiff.
  8. Turn up the speed gradually, then add the sugar, 1tbsp at a time – mix well between each spoonful.
  9. Spoon over the middle of the pie (once it has been removed from the oven) and using a spoon or a fork make soft peaks.
  10. Place the pie back in the oven with meringue on top under a medium grill for 1 - 3 mins or until browned. Watch it carefully so the sides don't burn.
  11. Remove the pie from the oven, and let it cool completely for 2 hours. Then place in the fridge.
Schema/Recipe SEO Data Markup by Yummly Rich Recipes
http://www.dreamingoffood.dk/index.php/2016/08/22/key-lime-pie/


key lime pie 2

Chocolate Chip Cookies

This chocolate chip recipe is one of the first you will find on allrecipes but it is my go to chocolate chip cookie recipe. The cookies are crispy on the edges, chewy on the inside, and have a really good flavor. Hope you like it too! 🙂


Chocolate Chip Cookies

Chocolate Chip Cookies

Ingredients

  • 1 cup butter (softened)
  • 1 cup white sugar
  • 1 cup packed brown sugar
  • 2 eggs
  • 2 tsp vanilla extract
  • 3 cups all-purpose flour
  • 1 tsp baking soda
  • 2 teaspoons hot water
  • 1/2 teaspoon salt
  • 2 cups chocolate chips

Instructions

  1. Preheat oven to 350 degrees F (175 degrees C)
  2. Cream together the butter, white sugar, and brown sugar until smooth.
  3. Beat in the eggs, and vanilla.
  4. Dissolve baking soda in hot water, then add to batter along with salt.
  5. Stir in flour, and chocolate chips.
  6. Drop by large spoonfuls onto baking sheet lined with baking paper.
  7. Bake for about 10 - 15 minutes in the preheated oven, or until edges are nicely browned.
Schema/Recipe SEO Data Markup by Yummly Rich Recipes
http://www.dreamingoffood.dk/index.php/2016/08/22/chocolate-chip-cookies/

French Galettes (Buckwheat Pancakes)

A Galette is a savoury buckwheat flour pancake that originates from the region of Brittany in France. It can be topped with egg, ham, cheese, spinach, salad, onions tomatoes, salmon, mushrooms, bacon…or whatever other toppings you might like. The most common variety has ham, emmentaler cheese, and egg.

I first tried Galettes in Copenhagen, Denmark, and loved them instantly. The buckwheat flour has a really good flavor, it gets toasted in a pan with butter, and together with the toppings it is really delicious. It is perfect to eat for lunch or brunch since it is both filling, but also light.

I decided to try to make Galettes myself, and it’s actually pretty easy. I don’t have a special Galette pan or tool, but they still came out pretty good. The trick is to get the pan very hot before you pour in some of the batter, and make sure the pan is buttered, and the batter coats the pan. Don’t worry if the first pancake you make doesn’t come out right, it can be a bit tricky in the beginning just like it is making any kind of pancake.

If you want to see a video on how to make Galettes, I made a video here:


I got the recipe from a french blog. It is really simple, and makes 10 Galettes. If you want to try to make them yourself I have translated the recipe below.


French Galettes (Buckwheat Pancakes)

Prep Time: 2 hours, 5 minutes

Yield: 10

French Galettes (Buckwheat Pancakes)

Ingredients

  • 300 grams buckwheat flour
  • 8 grams crushed sea salt
  • 750 ml filtered water

Instructions

  1. Mix the flour and crushed sea salt in a large bowl, slowly add in the water, and whisk until incorporated.
  2. Let stand covered for 2 hours at room temperature.
  3. Heat pan on a high setting.
  4. Coat pan with butter once hot.
  5. Add about half a cup (more or less) of the pancake batter to the hot pan, and move around to coat.
  6. Bake the Galette until crispy, about 3 - 5 minutes, then gently flip it over.
  7. Add your toppings in the middle of the Galette.
  8. Fold all four sides slightly. The sides you folded should have no toppings. This is just to ensure every bite has toppings in it.
  9. Serve on a plate.

Notes

I did not use filtered water, but that could be why mine didn't come out as crispy in spots, but they still tasted delicious. I also didn't use any special tools.

Schema/Recipe SEO Data Markup by Yummly Rich Recipes
http://www.dreamingoffood.dk/index.php/2016/06/13/making-homemade-french-galettes/

You can also serve this with a salad on the side. I bought some mixed salad leaves, and added Good Seasonings Garlic & Herb salad dressing on top. 🙂

Hope you enjoy this recipe!

Galette with ham and emmentaler cheese


Galette with ham, emmentaler cheese, scrambled egg, and a side salad.

Rustic Italian Bread

Yesterday I bought Manitoba flour at my local grocery store in Copenhagen, and I noticed a recipe on the back for manitoba bread. It was so simple just yeast, water, flour, and salt. I decided to try it, and was blown away by the results. This is just the kind of Italian bread recipe I have been searching for, and it’s so simple. It has a crunchy crust, but it’s soft in the middle, and tastes pretty amazing. Not only that but I was surprised how pretty it came out, with little effort.

If you want to see how I made a Rustic Italian bread with Manitoba flour check out my video here:


Rustic Italian Bread

Prep Time: 1 hour, 30 minutes

Cook Time: 30 minutes

Total Time: 2 hours

Yield: 1 baguette

Rustic Italian Bread

Ingredients

  • 3 g dry yeast (2 1/4 tsp)
  • 2 dl warm water (.84 US cups)
  • 240 g manitoba flour (1 - 1 1/2cups)
  • 5 g salt (1 tsp) regular or sea salt

Instructions

  1. Combine the yeast and water in a tall cup, cover with plastic wrap and let stand for 5 - 10 minutes.
  2. Combine the salt and flour in a large bowl.
  3. Add the yeast mixture to the flour/salt mixture.
  4. Stir together until a dough forms.
  5. Place dough on a lightly floured surface and knead it for 10 minutes.
  6. Place the dough in a greased bowl, cover and let it rise for 1 hour.
  7. Place the dough on a lightly floured surface to shape.
  8. Pre-heat the oven to 230C/446F.
  9. Pinch the sides of the dough together to create a smooth surface on top.
  10. Hand roll the dough to form a baguette or shape it into a round ball or any way you want.
  11. Dust the dough in flour, and cut slits in the dough with a sharp knife (optional).
  12. Bake the dough for 20 minutes at 230C/446F and an additional 8 - 10 minutes at 200C/392F.
Schema/Recipe SEO Data Markup by Yummly Rich Recipes
http://www.dreamingoffood.dk/index.php/2016/05/11/rustic-italian-bread-2/


Pretzel Bread Recipe

Yesterday I decided to make Pretzel Bread. I had never made this before, but I got inspired by a friend’s Facebook post of his adorable son munching on some pretzel bread at a restaurant. Yep, that’s all it took for me to find a recipe and try to make it myself, and I am so glad I did.

This bread is so delicious. It is firm on the outside and chewy and soft on the inside. I even decided to use two of the larger buns to make Philly Cheese steak sandwiches for dinner, and it worked out really well.

The recipe is below and if you want to see a video on how I made pretzel bread check out the video I made here:

Pretzel Bread Recipe (Makes 8 large buns)

Cook Time: 20 minutes

Yield: 8 large buns

Pretzel Bread Recipe (Makes 8 large buns)

Ingredients

    For the dough
  • 1 ½ cups warm water
  • 1 tblsp active dry yeast (1 package)
  • 2 tsp sugar
  • 4 ½ cups all-purpose flour
  • 2 tsp sea salt or kosher salt
  • 4 tblsp butter, melted
  • For the poaching & glazing
  • 1/4 cup baking soda
  • large saucepan of water
  • 1 egg, lightly beaten
  • pretzel salt or sea salt

Instructions

  1. Combine the water, yeast, and sugar in a cup, cover, and let sit for 5 - 10 minutes.
  2. In a large bowl, combine the flour, and salt.
  3. Add the yeast mixture and melted butter to the flour mixture.
  4. Stir together until a dough forms, then knead on a surface for 5 - 10 minutes or until smooth.
  5. Place in a greased bowl, cover, and let rise for at least 1 hour or until double.
  6. Divide the dough into 8 if you are making large buns or 16 if you are making small rolls.
  7. Roll each dough into a ball by pinching the bottom of the dough and turning it, then lightly coat it with flour, and place on a baking sheet lined with baking paper.
  8. Cover the balls of dough with a kitchen towel, and let rise for 30 minutes.
  9. Meanwhile bring a pot of water (2 quarts) to almost boiling, lower the heat to medium, and add in the baking soda. Stir it altogether.
  10. Then, place a ball of dough in the pot (pinched side/bottom side down), and let it sit for 30 seconds. Then, carefully flip it over and let the other side sit for an additional 30 seconds.
  11. Place the dough back on the baking sheet (bottom side/pinched side down).
  12. Repeat this until all the balls of dough have been in the warm water. You can do two at a time or more if you want, depending on the size of your pot.
  13. Brush the tops of the dough with a beaten egg, and then sprinkle a bit of salt on top of each bun.
  14. Take a sharp knife and make a slit on the top of the dough. I put two on the larger buns and one on the smaller rolls. This just makes them look nicer, so it's optional.
  15. Bake them in a pre-heated oven set to 425F/218C for 15 - 20 minutes.
Schema/Recipe SEO Data Markup by Yummly Rich Recipes
http://www.dreamingoffood.dk/index.php/2016/05/10/pretzel-bread-recipe/
That’s it. Hope you like this recipe. I’m not sure how to get the bread darker in color, maybe the water needed to be a little warmer or the buns needed to be in the water for a slightly longer time, but regardless the flavor and texture of the bread buns were really good.

Subscribe to my YouTube channel for more more yummy recipes. :o)